

Hello and welcome! Here at Master of Code Global, as a Conversational AI company, we’ve decided to share our approach to conversational design in this series of articles. Please enjoy and let us know your thoughts!
This series shares our approach to designing conversational experiences. The first part delves into the theory behind key best practices, followed by an in-depth look at structuring a conversational design flow chart.
The objective of building a conversational interface is the same as any other UI you might implement: to help your users accomplish their tasks easily and efficiently. Whether a searchable FAQ or pictures of retail goods, a UI lets users interact with your data to reach a successful outcome. Conversational AI is unique in doing so with a more personable, human-like touch – but it still needs to be efficient to be successful.
So how do you build an efficient Conversational AI solution? With a well-considered design, which involves more than charting a few boxes and arrows to arrive at a satisfied user. We’ll look at 4 of Master of Code Global’s best practices for designing the flow of your bot’s conversation with the user, then in second part of this article we’ll actually map out a flowchart.
Note that all of this is distinct from actually writing dialogue which is a topic we’ll investigate in subsequent articles. If we were building a house, this is where we consider a floorplan, not where we decide how to decorate the walls.
So let’s take a look at how to design a conversation while preventing it from getting side-tracked by unexpected situations!
Table of Contents
Bot Conversation Flow: Keep Moving Forward with the Call to Action
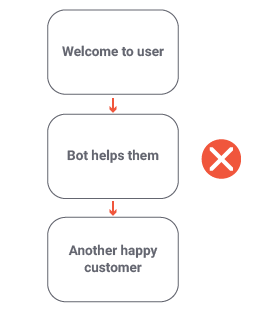
One of the most important concepts in conversational design is to always (kindly) push the user on to the next step of their journey. Remember, they are interacting with the system to accomplish a task and reach a successful outcome, but they may not know how to get there on their own.
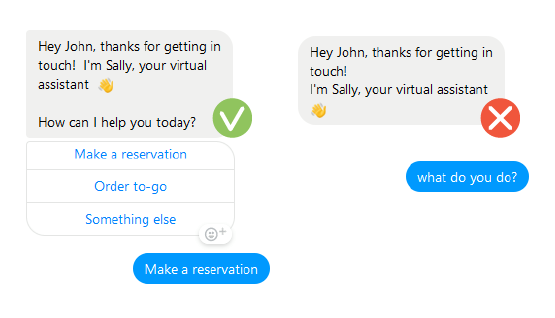
Consider the two greetings at right:The first image asks the user a question, it’s a “Call to Action” or CTA. Ending each of the bot’s turns with a CTA ensures that the conversation never stalls.
Meanwhile, the prompt on the right ends with one of the worst scenarios in all of Communications: dead air.
Nothing about the greeting on the right guides the user to their next step. In fact, dead air is so disastrous to a successful interaction that in one of the most demanding forms of real-time conversation of all – the world of improv comedy – there is a whole theory around managing such moments, called Blocking.
Key idea: Don’t block your users, always step forward. End each of your bot’s turns with a question, prompt or other Call to Action.
Focus the User’s Response
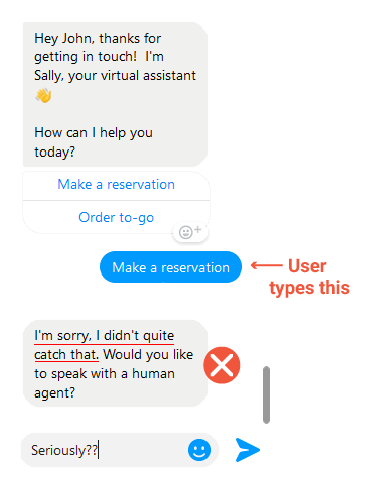
If you review the screenshot in the previous section, you may notice that even the greeting on the left opens the bot up to some unexpected responses. While we provided menu buttons, the greeting itself was quite open-ended – some users may miss the buttons on the left and type a response to the question which was asked: “How can I help you today?”
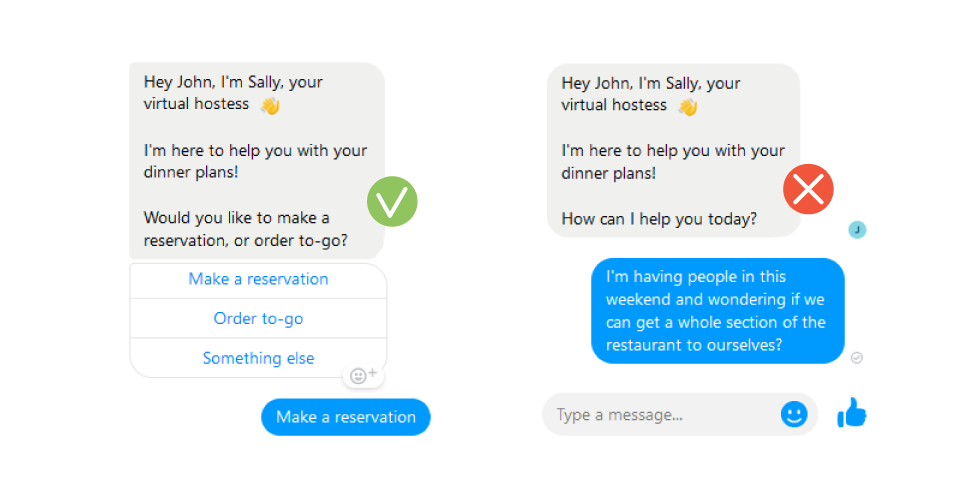
This question invites a wide range of responses, many of which are likely outside the scope of your bot. To reduce the amount of unexpected input that users send your bot, focus the range of responses they can easily give. Consider the difference between these two dialogues:
In the example on the right, we’re asking the user such an open-ended question that they are certain to reply in ways the system wasn’t built to handle. In the example on the left, we constrain their options – of course they may still type something unexpected, but at least we’ve increased the chances they reply with one of the options presented (even if they type it instead of pressing a button.)
This technique is actually the positive realization of a well-documented fallacy called the false dilemma. Happily, in conversational design we’re able to apply it for the good of the user, to help them achieve their goal.
Key idea: Focus the range of inputs a user is likely to give to promote responses your bot is designed to handle.
Circular Approach in Conversation Design Process
Suppose we’re designing a bot for a shoe store – consider these scenarios which deviate from the basic flow or happy path:
- User realizes they accidentally clicked on “loafers” instead of “sneakers”.
- User copy & pastes into the chat an image of the sneaker they want to buy.
- User says “actually I think I liked that other one you showed me” but the bot is unable to communicate with its NLU process to determine the intent of this utterance.
Are these all the same type of error? Do they each impact bot design in the same way?
No, the first scenario is different from the others, and recognizing the difference helps design a more effective flow:
- In scenario #1, the user gave valid inputs and the system is functioning correctly, but they want to make a change. Proactively giving the user options to address this situation is a good practice we’ll discuss below.
- Scenario #2 is a technical limitation as the bot isn’t able to interpret the image.
- #3 is a system failure.
While the system needs to handle the types of technical issues in #2 and #3, it isn’t practical or advisable to provide options to resolve these in advance, so they don’t influence the design of the user experience in the same way.So back to scenario #1. The system is functioning correctly, the user simply made a mistake. Users often type and select options quickly on mobile or web interfaces, which increases the likelihood of errors.
We’ve simply arrived at a place where a user wishes to edit or redo the selection they made in the chat environment.
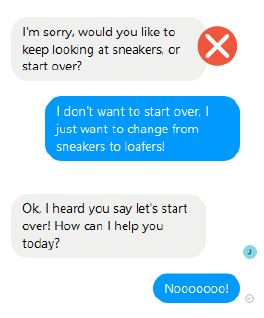
This sort of scenario could occur even if the user were interacting with a human agent:“You know what? I actually kind of liked the loafers…let’s go back and look at them instead.”
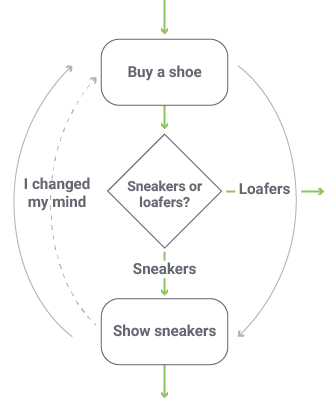
This type of mismatch can occur at any time, and the further into the flow it is, the more frustrating it will be for the user if they have to start over from the beginning to get back on track. How can we prevent this?
Key idea: As often as possible – ideally at each step of the flow – apply a circular approach to give the user the option to back up a step and change their path or give a different response.
Accommodate Text-Only Inputs
One type of unexpected input can be converted into expected input during the design phase: be ready for users to type the text-label of buttons and other controls, rather than using the control itself.
For example, if you provide a button labelled “Continue”, then you need to ensure that wherever this button is shown, the system is also ready for the user to type the word “Continue”. Otherwise, when this unexpected utterance is sent to your NLU process, it likely won’t be able to determine the user’s intent or separate it from other occurrences of the same word throughout your system.
Similarly, if the bot shows pictures of shoes and asks the user to pick one, then it needs to be designed to handle a descriptive input typed by the user such as “the red one,” rather than them clicking the picture of the red shoe. In a face-to-face conversation, people routinely supplement their words with facial expressions, body language and tone. It’s just as essential in bot design to plan for the user to provide input in multiple ways. Some chatbot platforms support this idea of translating labels to text more readily than others, but it still remains a function which must be planned for in advance so the development team can configure it.
This scenario may seem trivial, but it’s often overlooked by designers. If you don’t plan for it, then your users will end up in frustrating situations where they gave simple, reasonable input, but the bot wasn’t able to accommodate it.
Key idea: Always be ready for the user to type the name (or other characteristic) of buttons, graphics and controls, rather than using the control itself.
Designing for Success!
This article presented 4 of Master of Code Global’s best practices for designing conversation flow. These are lessons drawn from our own experience delivering successful solutions and using them will positively impact the design of other chatbots too:
- End each of your bot’s turns with a question, prompt or other Call to Action.
- Focus the range of inputs a user is likely to give, to promote responses your bot is designed to handle.
- Use a circular approach to give the user the option to back up a step and change their path or give a different response.
- Accommodate text-only input even when you’ve provided buttons, graphics and other controls.
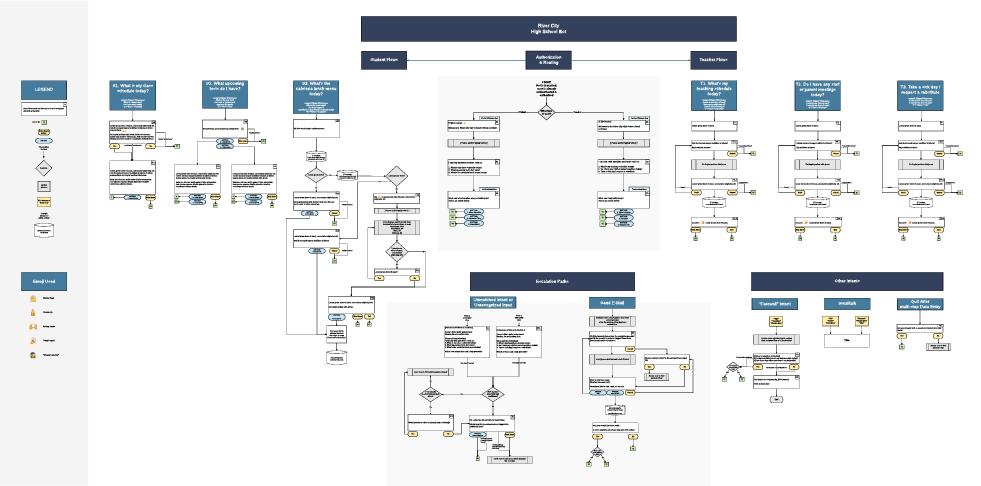
The next goal is to present the design in the clearest and most efficient way possible so that stakeholders can focus on what’s important: understanding the the user experience flow. We have found the approach presented here leads to common ground with the client, educating them as to the flow of the interaction without overwhelming in unnecessary detail.
Here’s a simple conversational flow chart or map example – throughout the article, we’ll look at samples from a fictional high school which is going to offer a bot to assist their students and staff with commonly asked questions: